Tuning Your Pinewood Derby Car for the WIN
Don’t waste cash on packaged tips and tricks until you read all of ours for free! Tuning Your Pinewood Derby Car for the WIN videos are posted on YouTube. Its posted at the very end of this article. Don’t own a treadmill? I bet you know someone that does. Buy them dinner, use it for an hour or two. Beg, Borrow, Barter. Do what it takes to get your win!
Without getting into all the fancy scientific answers, the plain and simple reason to tune a pinewood derby car is for speed! There are many different ways and theories out there. From wax paper to set screws. We like our method the best which shows your car traveling at its near top speed in a static setting. Utilizing a treadmill, you can see your car at its top speed while making all the necessary real-time adjustments. This is why a tuning board only shows half the problem.
Because a pinewood derby car is only powered by its stored gravity at the top of the track, you must tune your car so that it will use that stored energy to get the car to move down the track. If this is your first derby, or your last derby, take a few minutes to educate your self about Tuning Your Pinewood Derby Car for the WIN.
Tuning your car keeps the car moving forward. That is the ideal direction. A car that travels side to side, bumping each side of the car will not get you in the winner’s circle. A car that fish tails will not get you in the winners circle. Grandpa’s car wins becuase he puts the time in making sure the car does not do this. There is NO aftermarket part that will replace this step in building a car.
TUNING YOUR PINEWOOD DERBY for the WIN!
Setup: Install the wheels and bent axles on the car, use the gap gauge to properly gap wheels.
Right Rear – Apply axle with negative camber apply line in the 1 o’clock position.
Left Rear – Apply axle with negative camber apply line in the 11 o’clock position.
Steering axle = positive camber (opposite of rear) . Place line in 6 o’clock position. Ensure that one of the front wheels is not touch the ground prior to treadmill adjustment.
Tape the string on the center of forward kick plate of your treadmill, and tape it to dead center on the front of the car.
ABOUT Tuning Your Pinewood Derby Car for the WIN … here’s the quick and dirty.
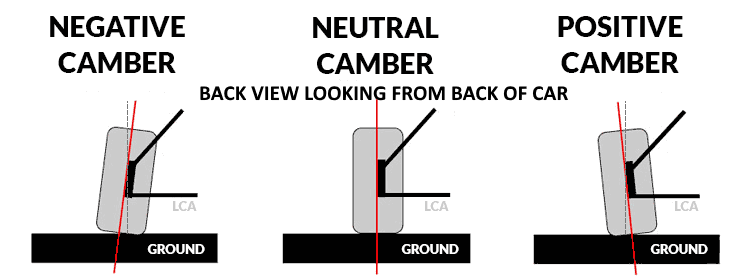
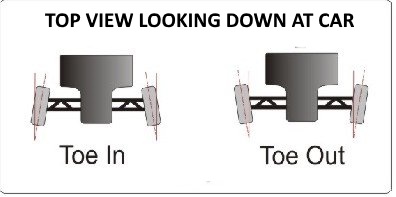
Each AXLE has 2 positions. A camber and a toe. Visual description is at the bottom of this post. But know that each axle needs to be adjusted within a certain parameter to be correctly installed. A lot of people get it wrong. So don’t be that person. Take the time to read this post. LOOK at the visuals I provide. Your car needs to ride exactly as I show.
Adjusting the rears: Adjust the rear axles until wheel is riding head of axle. Right side will move counter- clockwise, left side clockwise. Make small adjustments. Only adjust one side at a time until it complete. Looking from the top, down the wheel will toe out slightly or point away from the body. ONLY SLIGHTLY! The wheel will never touch the car body. So rears are negative camber with a slight toe out in final position. Look below to visualize prior to adjusting.
Steering axle = positive camber. Place bend in 6 o’clock position. For steer axle on right side, adjust steer from 6 o’clock to 3 o’clock position, adjust tuning arc as desired. For steer on the left side, adjust from 6 o’clock position to 9 o’clock position. Always steer into the high wheel. Note this is NOT STEER a car left or right. It is talking about which axle is your dominant steer wheel. The steer wheel will not ride the head of the axle. Positive camber does not ride head of axle. Looking from the top, down the wheel will toe in or point toward the body. So final position for the steer is a positive camber with a toe in position. Look below to visualize prior to adjusting.
Tuning:
Turn the treadmill on. 1-2mph at first. If incline is available, 1 degree would be great. Note the characteristics of the car. If it is swerving all over the place, there is a lot of work to be done. If it pulls to one direction or the other, directional tuning needs to be done to get to a slight deviation off center for a center rail rider (3 wheels) or center (4 wheels). Using pinewood derby tuning pliers, make an adjustment on a single axle turning tiny adjustments. The goal is to get your car to deviate just slight off center to make a center rail rider for fastest results
If adjustments are made and there is no change in the direction of your car, more than likely you have 4 wheels touching. Check!
If you need 4 wheel touching car:
Do the above tuning. Then do this:
Break in:
Once Tuning Your Pinewood Derby Car for the WIN is complete, turn the treadmill up to as fast as it will go. Your wheels are not going to burn up! Once you are happy with the wheel play, then it is time to start building up layers of dry lube.
Add a LIBERAL amount of dry lube to all running wheels as it is traveling every 45-60 seconds. Continue this process for 10 minutes. 10 minutes at top speed should yield the equivalent of approximately 400-500 races.
This process will also yield the 20-30 second spin benchmark theory! If you have a wheel that is not performing this well, it could possibly be that it is out of balance or has a warped inner hub due to cooling during manufacturing. Replace it and start process over from beginning (SORRY!) Weight reduced wheels DO NOT YIELD 30 second spin times. They do not carry enough mass to keep the process going.
After the 10 minutes. PACK your car up, and do nothing with it until race day.
No other lubing is necessary. We have not seen any data that shows any additional lube after this point helps.
What you have done by doing this process is used the cars weight under load to “roll” multiple layers of lube on the axle and wheel. You have also Tuning Your Pinewood Derby Car for the WIN to eliminate fish-tailing and gain greater speeds for your derby car way beyond a simple dust/ finger roll job. We have decided to share our research with you. This technique does not require a “drift” board, it does not require a test track, and it does not require a great knowledge regarding polishing techniques. It does build layers of near friction less surface on both the axles and inner wheel hubs that is good for many races.
This process is very hard to describe with words, and our video will show you how simple it really is.


